Thursday, June 24, 2010

Nisqually Icecliff

The weather was pretty much perfect on the upper mountain last Thrusday, Friday, Saturday and Sunday. Clear, cold, and calm. As the attached images will show, the Nisqually Basin routes (Icefall, Cleaver, Icecliff and Chute) all looked pretty good.

Nisqually Icecliff, on Saturday a solo climber successfully climbed the route. This marked the first summit for Mount Rainier in 2006, and a rather significant achievement for the climber, Hannah Carrigan.

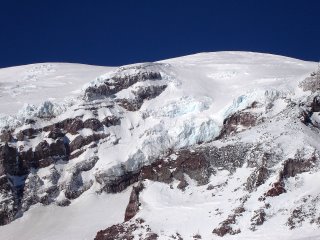
Carrigan, headed out towards the Nisqually Basin around dawn, considering both the Icecliff or the Cleaver route. The Cleaver was tempting, but looked thin and icy (particularly near the high traverse up on the Cleaver itself.) The Icecliff also looked hard and thin in places, but doable considering the winter snowload. In the end, she opted for the Icecliff.

Carrigan reported firm snow and ice for much of the route. There were a number of difficult problems to negotiate. One section of the icecliff required commitment to both ice tools while traversing and climbing. Getting across the Bergshrund at the base of the cliff also required technical climbing. One notable comment was that slots, crevasses, and steep sections viewed from below, grew substantially in size once on scene.

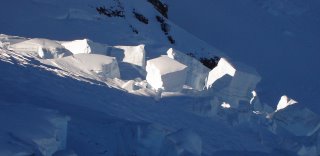
After passing the technical secions in the Icecliff, Carrigan then ascended the upper Nisqually Glaciers to the crater rim and Columbia Crest. She reported a number of open crevasses on the upper Nisqually and Ingraham glaciers. Despite the deep snowpack below 10K, there still seems to be some gapping crevasses up high.

Carrigan descended the Gibraltar Ledges back to Camp Muir. An excellent solo journey on a big mountain in the winter, Good Job Hannah!

Gibraltar Ledges, a few climbers have reported STELLAR conditions on this classic Rainier winter route. They stated that the route has more snow and ice than normal. The traverse along the ledge, and chute were particular hard and icy. This makes for excellent climbing, but also increases the difficulty. Climbers should bring pickets AND a few ice screws.

Ingraham Direct, there is some ice going through Cathedral Gap, but nothing too daunting. Once past the Flats, climbers have been ascending the right side of the glacier up to the top the Disappointment Cleaver. Though no teams have summited this route, it looks as though the route does go.

Wednesday, June 23, 2010

Power: Nature turned Generator

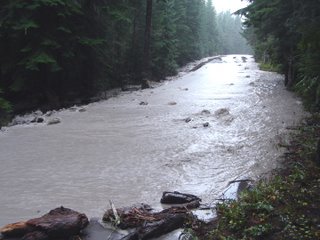
The rain seems to have stopped and now you can hear the Longmire generators (6-10 am and 4-8 pm that is). It's going to take some time to put things back in order, but it seems as though the main brunt of the storm and its damage have subsided.

Sunshine Point Campground near the Nisqually Entrance was disappointed with the weather trend and left Mt. Rainier National Park for sunnier locations. The problem is that it took the main road with it. I couldn't get a visual though because the road near Kautz Creek was under 3 feet of silty debris and water. The creek must have diverted upstream and chosen a new channel. See photo above.

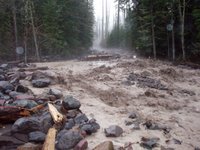
If you're familiar with the park, you'll notice a number of "new viewing areas" along the Nisqually to Paradise corridor next time you visit. The Nisqually River ran bank to bank and in doing so, took a massive amount of debris with it. Large trees fell, as new embankments were chiseled.

Here is another image of the westside road. See it? Neither do I. Well, 8 pm is approaching...

Trail to the Sun


Trail to the Sun, originally uploaded by ParsecTraveller.

Waiting for sunset on Poly Mountain in San Luis Obispo, California. The other shots I took were marred by pesky dust particles...time to clean the sensor.

The hills appear to be brown in the photo, but close examination of the earth along the trail revealed thousands of tiny seedlings coming up due to the 7.5 inches of rain we received the other day.

Climbing pack in Cham?


More on climbing packs from Dave Searle in Chamonix. Call it a Euro perspective :) Thanks Dave!


With the recent Cold Thistle theme being
centred around climbing packs I thought I’d put in a word or to as well.


Last year and the year before my climbing
pack was the Black Diamond RPM 26. It
was more or less the ideal Chamonix climbing pack and served me well on many
good days out from big north faces to sunny rock climbing and hauling 25litres
of water on training runs. Its simple
clean design, low weight and smart features where a real winner. The material is good, tough enough to withstand
granite chimneys (cheese graters) without being too heavy. With two side pockets and a small lid pocket
stashing gloves and snacks is easy and with a simple yet effective draw cord
compression on the front shedding a layer is easy to. It was however difficult to carry a rope on
the outside (
necessary
if
your packing bivy stuff) and the zip top
closure was slightly worrying. I never
had any problems but when the teeth start to sit funny it’s pretty scary to
think it could burst open at any time landing you in deep trouble.


I have recently replaced the BD with a Blue Ice Warthog 26.26 litres seems to me to be the
perfect size for a climbing pack out here in Chamonix. If you need anything bigger you’re either
doing something wrong or something very hard!
The only time I needed a bag bigger last year was on my failed attempt
on the Desmaison/Gouseault with would have required two bivi’s on the North Face
of the Grandes Jorasses.


I much prefer the lid system on the Warthog
which makes carrying a rope a breeze with the separate strap and the helmet
carrier is a great idea to, something that the RPM was missing . The Ice ace
loops are simple but work really well. I
have even jerry rigged the Rope carrying strap combined with a ski strap
through the lower Ice Axe loop to make a rudimentary but effective ski carrying
system. It worked fine with my 108
waisted ski’s and held the ski’s in the perfect cross carry position for
bootpacking.


The material on the Warthog is tougher and
a lot more durable so it should last longer than my RPM and also would take the
odd hauling session if required. The
removable light waist belt is good to (the same as the RPM). I never climb with a waist belt but it is
good to have one for those long slogs up to the bottom of the Jorasses.


The quality of Warthog is superb too. It’s still going strong after half a season
of use and abuse without any signs of wear.
I’m looking forward to giving it as much use and seeing
how it fairs!

Tuesday, June 22, 2010

Ice Climbing at the Asbestos Wall


I am really feeling like I’d like to get more into ice climbing.


Perhaps I should have said this before my last post about ice, but better to say it late than never: I know very little about ice climbing. The last thing I want is for someone who actually knows a lot about ice climbing to stumble upon these ramblings and come away thinking that I regard myself as some kind of real ice climber because I’ve toproped short, picked-out beginner walls on four occasions in my life. Obviously, I know I am a beginner. In offering my thoughts I hope to offer a beginner’s perspective on ice, and not much more.


With that out of the way, let me tell you about my day with V at the Asbestos Wall in the Catskills.


As the day approached, I watched the weather, hoping it would stay below freezing this time. On my last ice climbing day the temperature had spiked up into the mid-forties, leading to very wet and potentially worrisome conditions. This time around there appeared to be no problems in that regard. The high for the day was projected to be just 14 degrees, which is less than the ideal temperature, since when it is so far below freezing the ice can be brittle and chip off in plates when you stick your axe in it. But at least I could expect that this time it wouldn’t be so difficult to stay dry, and I wouldn’t have to worry about melting chunks falling on our heads.


I proposed to V that we check out the Asbestos Wall, mostly because I believed it would be easy for us to set up topropes. Neither of us was planning on leading. I of course have never led on ice, and while V has the screws and used to do it, our trip was going to be his first time on the ice in at least three years. So he just wanted to get a feel for it again and told me he’d prefer it if he didn’t have to lead.


I had never been to the Asbestos Wall, and in fact had never really considered trying it before because it has a reputation as an overcrowded nightmare, full of loud, inconsiderate gumbies hogging routes and hacking the ice into oblivion. It is also a very sunny wall and the ice tends to bake and get that milky/cloudy appearance that can signal poor conditions (hence the wall’s name). But since we were heading up on MLK Day, which is a Monday and a workday for many, I hoped it wouldn’t be too crowded. And with a forecasted high temperature well below freezing, this sunny area seemed like just the ticket.


When V and I arrived we immediately saw why the wall gets so crowded. The approach is incredibly easy. The ice is visible from the parking lot and the slope beneath the climbs is neither steep nor unpleasant. And although the sections of the wall aren’t terribly high—the tallest ones are maybe 40 feet, tops—they are generally vertical, with very few ledges or broken-up sections. Add to these virtues the ease of access to the trees atop the cliff and the place becomes a beginner ice climber’s dream come true.


All of this is provided, of course, that you have enough room to climb without fear of getting a rope dropped on your head. We met a woman at the wall who had tried to come the previous day (i.e., Sunday). She said her party had given up after being at the wall for less than an hour because they found the crowded conditions so miserable.


But on this holiday Monday we had no such issues. The woman I just mentioned was part of a group of three. There was a guided party and I think two other pairs at the wall all day. We found plenty of ice to share with this small group of climbers and had ourselves a great time. We set up ropes on three different sections of the wall over the course of the day, and at each section we were able to pick out three or four different lines to climb. We had no trouble getting a section of the wall to ourselves any time we wanted it. There were ample signs of the wall’s popularity; most of the climbs we chose had obvious pick markings, and some would have benefitted from some time alone to recover. In the most extreme cases there was evidence that fragile lower sections of the wall had been kicked out by clumsy, rough climbers who came before us. But there were some fat columns we climbed on which there was no evidence of prior climbers, most likely because these particular sections have so much water flowing through them that holes fill in and freeze over very quickly. We tried to find the least hacked-up lines we could, and took care not to cause further damage to any of the more fragile features we found. We had a fun day, one I’d repeat without hesitation. Even though the temperature was quite low we were in the sun until the late afternoon, and had no trouble staying warm, which of course presents another issue with this wall on warmer days, when it must be difficult to evaluate whether the ice is in good condition.


So I would recommend the Asbestos Wall highly, but only to beginners, and only on a weekday, and only when it is quite cold. It really is a sign of how popular ice climbing has become that you can find five parties at this wall on a weekday. I would guess that a decade ago you might not have found so many parties at this wall over an entire weekend. Now, it seems the weekend crowding is so bad that this wall becomes unbearable. Even during the week, I can’t imagine what this wallwouldoffer a solid leader on ice. There are better, longer, less-crowded climbs within a very short distance of this wall. But for easy access to steep toprope climbs, it’s pretty hard to beat.

Monday, June 21, 2010

Ski of Dreams


After spending 36 solid hours stuck in our tent at high camp, we were treated to fresh turns all the way back to Paradise.

Phend-Fisher Family Reunion Ledger - 1916

1916 - Eighth Reunion

[page 1]
The Phend reunion was held June 24, 1916 at the home of Will Phend. there were 61 present to enjoy the bountiful dinner and the good times following. Victor Phend spent his last day with his relatives before departing for the Mexican border.

The total expense of reunion for the year 1916, was $10 all made up in collection. No balance.
Officers for the ensuing year are as follows
Pres. Will Phend
Sec'y Mrs. Mary Phend
Treas. Jacob Phend

Following election of officers was prayer by Jacob Phend
A short talk by Chirst Phend
Oldest present Jacob Phend age 89 June 27 1916
Youngest Mary Alice Phend age 14 mo.
Blanche Evelyn Heckman age 15 mo.

[page 2]
Marriages -
Cecil Phend
Ivy Phend
Waldo Phend
Ivy Senff

Births
Delta Conrad
Cecil Phend. daughter 4th of April

[those who attended]
Mr & Mrs John Phend
Mr & Mrs Henry Phend
Gladys Phend
Bernice Phend
Donal Phend
Vergil Phend
Paul Phend
Gerald Phend
Mr & Mrs Christ Phend, Mary
Mr & Mrs W A Phend
Mr & Mrs F. A. Wehrly } LaMarr & Evelyn
Mr & Mrs Herly Phend
Mr. & Mrs. Harry Phend and Mary Alice.
Mr & Mrs Ivo Phend
Mr. & Mrs Harvey D. Senff
Lucile Senff, Arlena Senff.
Mr. & Mrs. Ralph Albert

[page 3]
Mr. & Mrs. Archie W. Senff
Wilbur R. Senff
Lulu Conrad
Lucile Conrad
Harley Conrad
Mabel Heckaman
Jacob J Phend
Jacob Phend Sr
John W. Miller
Mrs J. W. Miller
Violet Miller
Mr & Mrs Jacob E. Senff
Ruth Senff
Lawrence Senff
Hilda Senff


The Phend-Fisher families gathered for a reunion in Elkhart County, Indiana almost annually from 1909 until 1943. Usually held at Nappanee, the events of the day were recorded in an old ledger book. Spelling has been retained as it was in the original though some punctuation and paragraph breaks have been added. To view all articles in this series click on the "Phend-Fisher Reunion Ledger" label at the bottom of this post.

Sunday, June 20, 2010

Rider Fatigue and Bicycle Design

Randonneur Flying, Hanscom AFBWhile I'd heard cyclists speak of rider fatigue in relation to bicycle frame design and ride quality, I did not understand what exactly this meant until I got a chance to experience and compare a number of different bikes myself. Riding a variety of bicycles over the same routes, I've noticed that some make me more tired than others independent of the ride's intensity. I can be cycling strenuously on Bike A and really feeling it in my leg muscles, yet remain energetic for the duration of the ride and even feel"refreshed" rather than tired at the end. Or I can be cycling at a moderate speed on Bike B and not exerting myself much, yet feeling more worn out than during the more strenuous ride on the other bike.


A reasonable assumption would be that a heavier and slower bicycle would be more fatiguing than a lighter, faster one, but for me that is not always the case. It seems to have more to do with how the bike feels on the road. When a bike does not do a good job dampening road shock, I begin to feel exhausted very easily. I also seem to be sensitive to a bicycle frame's tubing, because some bikes just feel more effortful to propel forward than others, despite similar geometry, size and fit. Oddly, positioning does not seem to have as much to do with it for me as these other aspects: Some bikes I can ride for a long time in an upright position and some bikes I can ride for a long time in an aggressive drop-bar position, whereas on other bikes these very same postures begin to feel exhausting sooner.


What has been your experience with fatigue on different bicycles? Have you noticed any patterns or connections? I suspect that there is no one formula to this. No doubt it is a complex interaction between a number of factors, including individual anatomy.

Saturday, June 19, 2010

Arizona Sunset

I hesitated to post two sunset pictures in a row, but you take what Mother Nature gives you – the good along with the bad...


Benson, Arizona. Sunday, January 8th ...

Friday, June 18, 2010

Snow Bike SOS!

Snow Bike

This morning I received an email from a reader - Elise - who left her bike locked up outside a restaurant overnight, to find it covered in snow the next morning. Upon trying to retrieve the bicycle, she discovered that "allthe parts were snow-encrusted" and wasn't sure it was safe to ride,so sheleft it where it was and took the bus to work. Of course it then snowed again, and the bike's condition only got worse. Elise is wondering how to retrieve her bike after it's been in the snow in freezing temperatures for what has now been 2 days.


Snow Bike

While I don't know what condition Elise's bike is in, I can share what has happened to me in the past as a result of leaving a bike out in the snow for too long, and hope that something here might be applicable:


"frozen" wheels: Once I found that my bike did not want to roll after being left locked up outside in the snow. The front wheel would not budge, and at first I thought something was seriously wrong. On closer inspection, it turned out there was some frozen snow stuck between the fender and the tire. I cleared it out and "unfroze" the wheel.


clogged brake calipers:Riding a bike with caliper brakes in winter, I quickly learned that getting clogged up with snow eliminates their stoping power. And since snow does seem to love settling down on brake calipers and then solidifying, it is essential to clear it out of there. Wheel rims can also get iced over and may need to be wiped down.


icy pedals: A few times my pedals have gotten icy, to the point of making it difficult to ride the bike without my feet slipping off. When this happens I scrape them with the textured sole of my boot to break up the sleek surface, or try to rub some dirt on them.


"sluggish" drivetrain: Infreezing temperatures, it can sometimes feel that my drivetrain is slower, or not as smooth as usual. My understanding is that this is due to whatever lubricants are used on the drivetrain getting gooey from the prolonged cold. It is still okay to ride your bike like that as far as I know, but it might feel a little weird.


Each of these things has at some point made me panic and feel that a bike was "unridable" after being left out in the snow, but they all proved to be resolvable.


Snow Bike
Granted, other issues may not be as easy to deal with.I've heard stories of frozen U-locks being impossible to open, and of leather saddles snapping in half if ridden when frozen. And perhaps the most common problem of all isfrozen derailleurs, which I have no experience withsinceI do not ride derailleur-geared bikes in the winter.


Whether it's about components on the bike getting iced over, or the owner feeling that conditions are not safe enough to ride home, bikes get left in the snow - which all too often turns into full on abandonment. Any tips for avoiding thiswould be much-appreciated. How do you deal with a snow-encrusted bike?

Thursday, June 17, 2010

Assateague Island :: The Wild Ponies

For many people, the only reason for going to Assateague Island is to see the Wild Ponies. If so, it could be a little disappointing for them, especially if they only spend a few hours on the island. A 20-minute video shown at the visitor center provides a good, if somewhat romanticized view, of the little ponies that have roamed the beaches, pine forest, and salt marsh of Assateague Island since the 1600s. There are two theories regarding the stout little ponies: one is that they arrived on Assateague's shores when a Spanish galleon ship, with a cargo of horses, sank offshore. The other is that they are remnants of the herds of early colonial settlers who grazed their horses on the Island. Apparently a Spanish ship wreck was discovered recently in the waters off Assateague which gives credence to the first theory.

Both the Maryland and Virginia sides of Assateague Island have wild ponies; each has a herd of about 160 and a fence at the state line keeps the two herds separated. They roam the island in bands of 5-10 ponies so you aren't going to see a lot of them all at once. I did see a group of 10 or so one day sauntering through the main parking lot on the beach side of the island. They were there long enough to stop traffic, then moved on down the road.

Although there are 30+ miles of beautiful white-sand beach, the part that is easily accessible to visitors is only about 5 miles long. Undoubtedly, the ponies roam the beaches too but I never saw any on the beach though they were grazing along the road on the beach side of the Island. I did see quite a few ponies on the bayside - in the marsh areas and in the campgrounds. My suspicion is that there were one or two bands of ponies that roamed those areas and I kept seeing the same horses over and over ;-)

These guys followed me around for quite awhile one day. I'd back off and they'd keep coming. Eventually they tired of the game and went off looking for better pastures.

The grass must have been pretty good alongside the marsh boardwalk. On this day there was a group of six of them. Three were on the boardwalk and the other three were off in the marsh. The ponies aren't very big. Short and stout is an apt description. In the background there is a woman standing next to two ponies, she towers over them. The tallest ones that I saw were maybe 5 feet tall.


There are signs posted stating that you are not to feed, touch, or even approach the horses. I never saw anyone feed them but did see a few people touching and petting them. I didn't go searching for the ponies. If they were in the same area where I was I'd go see them but I really didn't get too close. They are considered to be wild animals but they are definitely not afraid of humans. The ponies are left on their own, to fend for themselves. They are not cared for or treated if they become sick. The only food they get is what they find for themselves: marsh and sand dune grasses, rosehips, bayberry twigs, persimmons and even poison ivy.

Wednesday, June 16, 2010

Interlude...

Saturday, September 17th - - After leaving Yellowstone National Park I traveled toward the small town in southwest Montana where I stayed for most of July last year. It looks much different here now than it did then – the “hills” are mostly brown providing quite a contrast between the lush, green areas that are irrigated or those along the rivers, which are lined with trees. The weather has been rather nice with lots of sunshine but the skies have mostly been the “hazy-white” variety, which isn't conducive to obtaining “pretty” pictures of the scenery.


I've been here almost two weeks and have been taking advantage of the time to “catch up” on blog reading and writing, a little research (very little), and going through the pictures I've taken this year. Much of my time has been consumed/absorbed with work on the netbook. So much so that I feel like I've been sucked into the vortex of the computer, which is a never-ending cycle!


As mentioned in a previous post, I've been looking for a new camera and hadn't had much luck with finding one in stock. The stores had the ones I was interested in on display but didn't have them available to purchase. I finally gave up going to a “brick and mortar” store and bought one online! I went with the Nikon P500. The other camera that I was looking at was the Canon SX30. They both have similar features but the Nikon just “felt good” in my hands. It arrived a little over a week ago and I've been having some fun playing with it and learning some of its features. It will take some practice to get used to what it can do; it's amazing to me what all they've packed into this thing!


After the camera arrived and it took five hours to charge the battery in the camera, I realized I would need another battery and an external charger. Those were ordered and arrived here on Tuesday. It still takes about 2 ½ hours to charge a battery but that is better than 5 in the camera!


One of the things that I really wish came with the camera is a printed manual, but nowadays that is not likely to happen. The pdf manual comes on a CD and it's easy to find what you are looking for, but it's just a little difficult to look things up when you are “out in the field” using the camera!


So far, I'm quite happy with the camera.


Silver Salt and Pepper Shakers


Monday, June 14, 2010

Oscar


The cat who's trying to adopt us.

I should say, the wild tomcat who's trying to adopt us.

The wary cat who won't let us near him, but who will handle all the food we might happen to leave lying around.

The wily cat who really needs to go to the vet but can't (so far) be caught.

Fresh from a recent Odd Couple viewing, Hubby named him Oscar.

Aspen Tree in Sandia Mountains

This is an aspen tree we saw on our recent trip to the Sandia Mountains. This was what is considered the 'backside' or west side of the Sandias. It is a narrow, usually single lane, dirt road that goes up the mountain from the town of Placitis, NM, which is north of Albuqueque.

Sunday, June 13, 2010

Shimmering Sky


On the night of September 5th we had an unexpected display of the Aurora Borealis (Northern Lights). When I went to bed that night I looked out my bedroom window and thought "Hmmmm... looks like Northern Lights out there!" Sure enough, I went outside and looked up and saw the Aurora shimmering in the sky directly over the house. I went out into the yard and made this picture looking straight up into the sky. The lights were beautiful, but difficult to photograph because of the waning half-moon.

Black Diamond's Fusion 2

I intentionally stay away from writing too much on ice tools. I am very specific in my likes and dislikes and obviously swayed by them. It isn't fair to to allow my prejudice to blanketly sway people too far on ice tool choices.


I have been doing this stuff long enough to realise if you know what you are doing that almost anygood club with a big nail through it will get you up most anyice.


Youdon't have to climb hardby today's standards to know the difference. (and I don't climb that hard) But I know what I like and why and why I don't like other tools. I continually get surprised by my judgement of the cosmetics.


Case in point. The Petzl Nomic (old or new) looks to have been almost perfectly cloned by the now last year's version of the Green Machine, Black Diamond's Fusion.


Pictured are a Fusion (the Green Machine) and a last year's Nomic over layed.


While they are close there are subtle and meaningful differences. Which most will readily recognise climbing on either tool and making a comparison.


To no one's surprisewho worked on the Black Diamond design effort, the new Fusion was not, even given the hammer and removable spike,an all around tool. Its performance on pure ice could be better. The Nomic, as much as it might appear not to be (with no spike and no hammer), works well on ice and on hard mixed.


Black Diamond, to their credit, has from the beginningmarketed the Fusion as an expert's tool for modern mixed. Petzl did the same thing on the Nomic as well, and missed a wide audience at first. Black Diamond in this case was well advised to "stick" withtheir plan. I get asked more often about the Fusion than any other tool..."how do I makeit climb ice better."


Obviously the Fusion will climb ice, as hard of ice as it comes these days. But if you are capable of climbing that kind of ice you aren't asking me how to "fix" a Fusion.


Where the Fusion really shines is on hard mixed. No surprise as two of the guys intimatly involed in the design work were Roger Strong and Raphael Slawinski. Bothare known internationally for their abilities on hard mixed.


Raphael Slawinski


Roj.....Roger Strong.


So when some one asks me what I think of a Fusion as a intermediate's ice tool I suggest they look else where. But if you want to really push your mixed climbing the Fusion is a shoo in. One of the best no question.


I can argue the pick angle and pick design with the best of them. But when it comes to hooking hard thin moves (which I can't do btw) I know what worksand why. One of the major advantages of the new Fusion over most anything else currently, is the rigid,hydroformed shaft. No or less flex in the shaft means less pick shift, ie,movement and angle change.


Again to no one's surprise, I literally can feel the flex and bending of the shaft with every pick set on some of my favorite tools. I know the limitations of that flexand address it accordingly by using it on terrain where it isn't going to matter. Great idea but poorly done in over all design for the intended audience.


The hydro forming is great technology and way ahead of everyone else in the game but if I was a BD athelete I'd be asking for the next generation of Fusion with a *carbon fiber* shaft :)


No question here it is the INDIAN not the arrow....but a bad arrow will miss the mark no matter how good the Indian.


Markus Bendler won the first two Ice Climbing World Cups this winter - with the new Fusions!

Josh Warton has won three consecutive Ouray Comps on Fusions....2 on the Original orange Fusion and the last and I think the most imopressive win on the Green Machine..the newest Fusion.


If you are capable, the Fusionis a scalpel. Just thought a great design, done specifically for one reason in the climbing community,when so few things are, should get the credit it isdue.

Saturday, June 5, 2010

Yard sale!


A few new things if you are in the market and the right size... Baruntse size 43.5, TRAB skimo race bindings, couple pair of skisand some shells and insulation.....among other things.


http://coldthistletools.blogspot.com//03/yard-sale.html


Gotta pay for those new toys to review some how ;-)


Wednesday, June 2, 2010

Bryant Peak ..

This is more a document of my failure than a trip report. I had the goal of heading up Bryant Peak from what I believe to be the standard route today. (The gully to the east and take SE Ridge to the top.) I should have known things would not go well when I viewed Mount Rainier from the I90 bridge and realized I had left the camera at home. Oh well. I continued to Alpental.

I arrived to find only one other vehicle in the parking lot. My guess is they were headed to Chair. I loaded up and headed up the trail and noticed there was what appeared to be two sets of bare boot prints heading up the trail. The groomed section was less icy than last week, and when I left the groomed area, that was less icy as well. I was making good time. In thirty minutes I had arrived at the turn to head up to the hanging valley. This is where I started to realize the foolishness of my decision not to bring floatation.

Last week the snowshoes were great. But I incorrectly assumed that with more traffic up there and subsequent freeze/thaw cycles that I would be fine without any floatation. I was very sadly wrong. When I first left the trail it was not so bad and I was sinking in ankle depth. As I headed up I tried to stay on downhill ski tracks or faint boot tracks. It didn't make much difference. Soon every step was calf deep. By the time I was near the top I got some breaks by following a previous boot track. This track ran out and I was now going knee deep on most steps, with occasional steps going thigh deep. I persevered. I told myself it would get better once the angle eased in the bowl. This may have been the only thing I was right about. It did ease, and I picked up another boot path where I enjoyed respite from the post hole nightmare. Of course this had to end as the path went to the head of the bowl and I needed to head toward the gully that would start my climb.

The snow was deep mash potatoes. I picked a line and headed up. Being a lower angle, it was nicer than coming up from Source Lake, but I was expending energy at high rate just to move ahead. I finally came to a stop to put my pack down and investigate the slopes. There were plenty of wet slides that look like they probably happened the day before. I also saw some sloughing and heard rockfall periodically. I put my pack down and attempted to hike up into the shaded slope to dig a pit. I moved about 40m uphill (about halfway to the shadow) and it took me more than five minutes! I stood there with the gully in front of me and realized it would have to wait for another day. I figure in the conditions the snow was in, it would have taken me about two more hours to summit, and I just wasn't interested in that wallow. As it was, it took me an hour and a half from leaving the trail to reach my high point.

So I turned around and gathered my pack and plunge stepped down to the trail. While significantly easier (it took me less than 25 minutes to descend what took me 1.5 hours to ascend.) The plunge stepping was still somewhat difficult even if it did take less energy. I was sinking knee or thigh deep on every step. When I got home I read this trip report where they had snow shoes and still were sinking calf deep. The snow was actually skiable and if I had brought floatation I think things may have turned out different. Although I could not have used it during the technical portion of the climb and that would have still been a wallow.

Blue dot marks my high point.

Tuesday, June 1, 2010

Gunsmoke

Newspaper photo of James Arness who played Marshal Matt Dillion on Gunsmoke. There was a question from someone wanting to know if he was too big to ride a horse. Apparently they never watched the show or they would have known the answer.